


From the smallest items of food and drink, to the largest pieces of gear, here are a selection of items found in Elrood sector, and beyond...
Binoshi Vibroglaive
 There
are few sounds more frightening than the shriek of an incoming Binoshi
vibroglaive. Thankfully, these fearsome weapons are rare enough that not many
have been faced with them. Fewer still have faced them and survived.
There
are few sounds more frightening than the shriek of an incoming Binoshi
vibroglaive. Thankfully, these fearsome weapons are rare enough that not many
have been faced with them. Fewer still have faced them and survived.
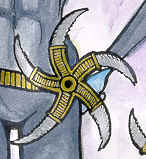
The primary weapon of the mysterious Binoshi Assassins, the vibroglaive is made of a five-pronged gold metal centre, from which spring five fearsome blades of razor-sharp steel. At the touch of a button, the blades emerge, and the tiny vibration and repulsor systems are engaged (it is these systems which give the spinning vibroglaive its hair-raising screaming sound). Once thrown, the vibroglaive, if it actually misses its target, will return to its owner. This is only partially dependant on skill, however. For though the Binoshi are skilled combatants, the vibroglaive is aided in its flight by a tiny, primitive guidance system. As long as the vibroglaive is thrown with at least some rudimentary skill, it will find its way back to its owner, even if he or she is moving. This, of course, gives rise to the problem of actually catching the vibroglaive. The Binoshi experts seem to have no problem with this, however.
Extremely rare in the galaxy, these vibroglaives have only been seen employed by their Binoshi owners, themselves an extremely rare sight. Given what little is known of the Binoshi, it is likely that a being from any other species seen carrying one of their vibroglaives would not be allowed to live for long.
|
Binoshi Vibroglaive |
Killjoy
Most often, people with extraordinarily high skills and aptitudes put their proficiencies to work to better themselves, their community, or their environment. There are those few others, meanwhile, who dedicate their particular talents and abilities to making life miserable for everyone else.
Such is the case with "Killjoy", an appropriately-nicknamed renegade technician who makes his home somewhere in the Outer Rim. Few have met this mysterious individual, or even know to what species he belongs. Many, however, have felt the sting of his particular brand of genius. Killjoy has dedicated his life to the invention and construction of sabotage devices, for use in many industries, and many walks of life. His pride in his work is made evident by all of his creations actually sporting the Killjoy logo, laser-engraved by the villainous person himself.
The most famous (and most widely used) of his devices is a particular hyperdrive disruptor, small enough to be easily concealed and yet powerful enough to halt the light drives of any space transport. The device works by lowering power to the hyperdrives sometime after their activation, and concurrently sending messages to the vessel's hyperdrive computer that there is absolutely nothing amiss. The affected ship will gradually begin slowing down, ultimately dropping back to realspace. Quite often, the vessel's crew will realize something is amiss before this happens, when it becomes clear their ship is hours (or even days) overdue to its destination.
Killjoys are a hot black-market item, and can be found in many shadowports around the galaxy. Though most types of Killjoys are good only for a single use, many people find they are worth it, for the sheer delight of having their enemies find a device with the Killjoy logo, and realize they've been had.
|
Killjoy |
|
Space Transports Repair roll: |
Killjoy effect: |
|
Very Easy |
malfunction, Killjoy destroyed |
|
Easy |
incorrect hookup, try again |
|
Moderate |
travel time increased by 25% |
|
Difficult |
travel time increased by 50% |
|
Very Difficult |
travel time increased by 75% |
|
Heroic |
travel time increased by 100% |
This device is but one of many designed by Killjoy - Gamemasters are encouraged to invent their own variety of Killjoys, and perhaps even find a place for this nefarious individual in their own campaign...
LDS
Short for Laser Dispersal System, the LDS is a very expensive, yet very effective security measure employed by some corporations and wealthy individuals around the galaxy.
The system involves a number of small projectors which emit an energy that, when present in sufficient quantities, will dilute and nullify blaster bolts. This energy is detectable, in the form of a tell-tale yellowish glow that can be detected if one looks closely enough.
The LDS is effective in enclosed areas, and is normally employed only in small offices and chambers - its high price making the system impractical for use in larger areas.
|
LDS |
Xanefredine
Banned during the era of the Old Republic for its highly dangerous properties, the 'amnesia drug' Xanefredine can still be found employed by the various shady organizations who benefit most from its use.
This drug comes in two solutions. The first, Xanefredine 'A', is introduced into a being's bloodstream via a standard hypo. If applied in the proper dose, the patient is scarcely aware that anything has happened at all. Up to thirty minutes later, a dose of Xanefredine 'B' can be applied. When this happens (and again, if the dose is correct), the patient loses all memory of the events that took place between the application of solutions 'A' and 'B'.
Though this drug is certainly effective, it has sadly killed more beings than not, in the hands of medics insufficiently trained in its use.
Xanefredine
The GM should not reveal to the player if he made the difficulty or not - simply tell the medic player how many dice to roll to apply the 'A' solution. The GM then rolls opposing dice for the stamina of the patient. If the dose 'beats' the patient's stamina, the solution works but the patient must consult the damage table. If the patient's stamina 'beats' the dose, the solution is applied properly, with no ill effects. If the patient's stamina beats the dose by 10 or more, the Xanefredine has no effect. Of course, if the patient suffers no damage, neither he nor the medic will be aware if the dose worked, or not. Only upon application of the 'B' solution will it be revealed if the Xanefredine had its desired effect. Only this time, the medic may simply decide what size dose to give the patient, based in his reaction to the 'A' solution. If the 'B' solution isn't introduced within thirty minutes, the 'A' solution will dissipate and leave the patient unharmed. |
![]()
![]()
![]()
![]()